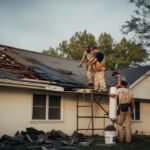

Installing a steel roof requires a systematic approach that begins with a clean, stable deck, followed by the application of a high-quality moisture barrier and the precise mechanical fastening of metal panels. The metal roofing installation steps involve laying panels from the eave toward the ridge, ensuring each section overlaps the next to create a water-tight seal. Success in this steel roofing installation process depends on maintaining a square layout and using specialized gasketed fasteners that allow for the natural expansion and contraction of the metal.
This guide provides a comprehensive breakdown of the technical requirements for a successful installation. Homeowners and contractors find that steel offers a lifespan two to three times longer than traditional materials, provided the installation follows specific manufacturer guidelines. Seattle Roof Systems emphasizes that proper ventilation and correct fastener tension are the most important factors in preventing long-term structural issues.
Necessary Tools and Material Preparation
Before the first panel reaches the roof, gathering the correct tools prevents delays and ensures safety. Steel panels require specific cutting methods to avoid damaging the protective coatings. Standard circular saws can create excessive heat that melts the galvanized layer, leading to premature rust. Instead, use electric shears or nibblers for a clean cut.
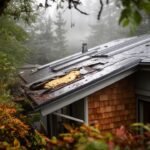
The preparation phase also includes a thorough inspection of the roof deck. Any rotted wood must be replaced to provide a secure anchor for the fasteners. Unlike shingles, steel panels exert different types of tension on the substrate, making a solid base mandatory.
Essential Equipment List
- Electric metal shears or nibblers
- Screw gun with adjustable torque settings
- Magnetic hex head drivers
- Pop rivet tool
- Chalk line for layout marking
- Fall protection gear and non-slip footwear
Bonus Tip: Avoid using a pencil to mark steel panels. The graphite can react with the metal coating and cause corrosion over time. Use a felt-tip marker or a specialized metal-marking chalk instead.
Installing the Underlayment and Drip Edge
A secondary water barrier is a requirement for any residential roofing project. While older installations used standard felt paper, modern standards favor synthetic underlayment. These materials offer better tear resistance and provide a smoother surface for the steel panels to sit on. According to technical data from the National Roofing Contractors Association, synthetic underlayment also performs better under high-temperature conditions often found beneath metal surfaces.
The drip edge goes on after the underlayment at the rakes, but before the underlayment at the eaves. This configuration creates a reliable water-shedding path, ensuring that any moisture reaching the underlayment flows directly into the gutter rather than behind the fascia board. Seattle Roof Systems applies a self-adhering ice and water shield along the eaves in colder climates to prevent damage from ice damming.
Organizing the Panel Layout
Starting square is the most difficult part of installing a steel roof. If the first panel is even slightly crooked, the error will grow across the length of the roof. To avoid this, measure the distance from the ridge to the eave at both ends of the roof. Use a 3-4-5 triangle method to ensure the first panel sits at a perfect 90-degree angle to the eave.
Once the first panel is aligned, it should overhang the eave by about one inch. This overhang helps water clear the drip edge and prevents capillary action from drawing moisture back under the metal.
Panel Specifications and Requirements
| Installation Factor | Steel Panel Requirement | Practical Benefit |
|---|---|---|
| Minimum Slope | 3:12 for most screw-down panels | Ensures proper water drainage |
| Minimum Steel Gauge | 26 or 24 gauge for residential | Provides dent and wind resistance |
| Overlap Distance | One full rib or 6 inches | Prevents wind-driven rain entry |
| Sealant Type | Butyl tape or tri-polymer | Weatherproofs the horizontal laps |
Securing Steel Panels and Fasteners
The method used for installing metal roofing panels focuses heavily on fastener placement. Screws should be driven into the flat areas of the panel, not the ribs, unless specified otherwise by the manufacturer. Each screw features an EPDM rubber washer that creates a seal when compressed.
One common mistake is over-tightening or under-tightening these screws. An over-tightened screw will crush and splay the washer, causing it to crack within a few years. An under-tightened screw leaves a gap for water to enter. The goal is to compress the washer just until it reaches the edge of the metal screw head.
Bonus Tip: Run a string line across the roof at every purlin or fastener row. This ensures that all screw heads align perfectly, which creates a professional look and makes it easier to track the internal framing.
Managing Thermal Expansion
Steel expands and contracts as temperatures change. A 30-foot panel can move significantly between a cold night and a hot afternoon. If the fasteners are too rigid or the panels are pinned too tightly, the metal will buckle, or the screw holes will eventually elongate. This is known as “oil canning” or fastener fatigue.
Data published by the Metal Roofing Alliance suggests that metal roofing now represents about 18% of the residential remodeling market, partly because modern installation techniques have solved these expansion issues. Installers should use fasteners designed for the specific substrate, whether wood or metal, to ensure they hold firm during these thermal cycles.
Finishing Ridges, Valleys, and Hips
The final stage of the steel roofing installation process involves installing the trim pieces. Valleys are the most vulnerable areas of any roof. They require a wide W-shaped flashing that sits beneath the panels. Use a generous amount of sealant or closure strips to block debris and insects from entering the gaps where the panels meet the valley or the ridge.
Ridge caps cover the peak of the roof. For a ventilated attic, a vented ridge cap is necessary. This allows hot air to escape while preventing rain from blowing in. Closure strips, which are foam inserts shaped like the panel profile, are placed under the ridge cap to fill the voids created by the ribs.
Things to Consider Before Making a Decision
While steel roof installation is highly technical, proper planning is just as important. Steel roofing requires a flat surface, as any imperfections in the roof deck can create a wavy appearance. Before starting, it’s helpful to review roof replacement costs to understand budget expectations. Environmental factors like coastal salt or heavy snow also affect material choice, with aluminum or stainless steel often preferred in harsher conditions. Additionally, while insulation minimizes noise, homes with open ceilings may still notice sound during rain. To better understand long-term performance, explore roof lifespan and durability.
Common Questions
Many people ask if they can install a steel roof over existing asphalt shingles. While many building codes allow this, it requires the use of furring strips to create a flat plane and provide a ventilation gap. This method also adds weight to the structure, so a professional inspection of the rafters is recommended.
Another common concern is lightning. Research from the National Fire Protection Association indicates that metal roofing is no more likely to be struck by lightning than any other type of roofing material. Because steel is non-combustible, it actually provides a safer environment if a strike does occur.
Specific Installation FAQs
How many screws are needed for a standard steel panel?
Most residential roofing services use approximately 80 to 100 screws per square (a 10×10 area). This count varies based on local wind load requirements and the spacing of the underlying supports.
Can you walk on a steel roof after it is installed?
Yes, but you must walk only where the fasteners are located or directly over the underlying support beams. Walking on the high ribs or in the middle of a long span between supports can dent the panels or break the seal of the fasteners.
What is the best way to cut steel roofing panels?
Cold-cutting tools like nibblers or shears are best. They preserve the factory-applied zinc or Galvalume coating on the edges. Using a high-speed saw blade can burn the edge and lead to rust streaks within a few months of installation.
Do I need a special underlayment for steel roofing?
A high-temperature synthetic underlayment is highly recommended. Metal roofs get much hotter than asphalt, and standard felt can stick to the metal or degrade quickly under intense heat.
Direct Advice for Homeowners
A steel roof is a significant investment that provides long-term protection and energy efficiency. According to the U.S. Department of Energy, reflective metal roofing can reduce cooling costs by up to 25% in warm climates. When planning an installation, prioritize the quality of the fasteners and underlayment as much as the panels themselves. These hidden components often determine whether the roof lasts its full 50-year potential. Always verify that the chosen installer follows the specific wind uplift and fastening patterns required for your local building code.
Professional Residential Roofing Services
Choosing the right materials and following precise installation steps ensures a roof that lasts for decades. Seattle Roof Systems provides technical guidance and professional implementation for a variety of metal roofing projects. For questions regarding specific material gauges or local building requirements, contact the team at (425) 996-1386 or send an email to zoom@seattleroofsystems.com. Accurate planning and professional execution result in a durable, high-performance roof.
Sources
- National Roofing Contractors Association – Professional trade organization providing technical standards for roofing installation.
- Metal Roofing Alliance – Industry group offering data on metal roofing market trends and durability.
- U.S. Department of Energy – Government resource detailing the energy-saving benefits of reflective roofing materials.
- National Fire Protection Association – Authoritative source for fire safety standards and lightning strike statistics for buildings.